Reconciling your bank accounts in QuickBooks Online is crucial for maintaining accurate financial records. It ensures your books match your bank statements, helps catch errors, and provides a clear picture of your business’s financial health. But what happens when you accidentally reconcile an account with incorrect information or need to make changes after the fact? Don’t panic! QuickBooks Online allows you to undo reconciliations, albeit with some considerations.
This blog provides a step-by-step guide on how to undo reconciliation in QuickBooks Online, along with important caveats to keep in mind.
Understanding the Implications Before You Start
Before diving into the how-to, it’s vital to understand that undoing a reconciliation can have ripple effects. Here’s what you should consider:
Data Integrity: Undoing a reconciliation essentially removes the “cleared” status from all transactions within that reconciliation period. This means you’ll have to re-reconcile those transactions, which can be time-consuming.
Reporting: Financial reports generated after the original reconciliation may be affected, showing discrepancies until the account is re-reconciled.
Potential for Errors: Improperly undoing a reconciliation can lead to errors in your financial records if not handled carefully.
Steps to Undo a Reconciliation in QuickBooks Online
While the process itself is relatively straightforward, following these steps carefully is crucial:
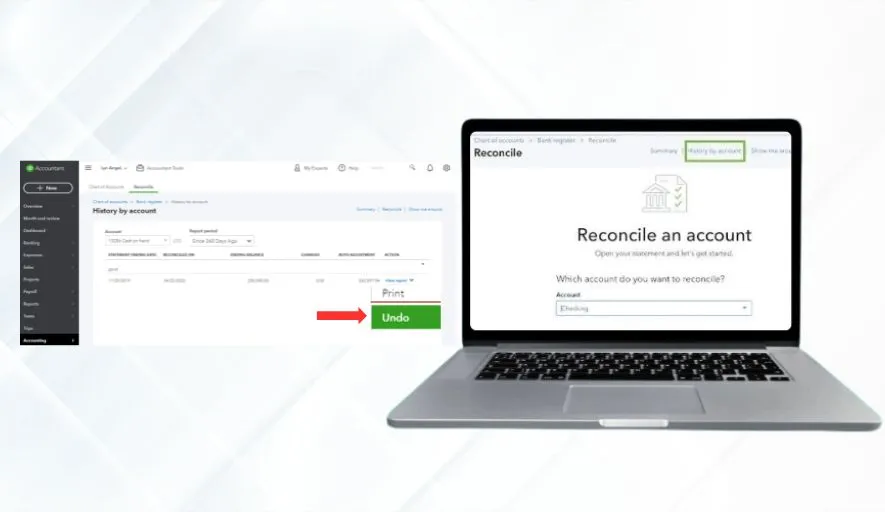
Method 1: Using the ‘Reconciliation History’ Feature (Recommended)
This is the preferred and generally considered safer method.
Navigate to the Reconciliation History:
- Go to the Gear icon (Settings) in the upper right-hand corner.
- Under “Tools,” click on Reconcile.
- Click the History by account link at the top. (If you’re already in the reconciliation screen, you may see a “History” button directly.)
Locate the Reconciliation to Undo:
- Select the Account you want to unreconcile from the dropdown menu.
- Find the specific reconciliation you wish to undo. You can identify it by the date and ending balance.
View the Report:
- Click the View Report button next to the reconciliation you want to undo.
Undo the Reconciliation:
- In the upper right corner of the reconciliation report, click “Undo.”
Confirmation & Warning:
- A warning message will appear, reminding you of the potential impact of undoing the reconciliation. Read it carefully.
- If you understand the implications and are sure you want to proceed, click “Yes” to confirm.
Method 2: Using the ‘Register’ (Less Recommended)
This method is generally discouraged as it’s more prone to accidental errors.
Go to the Account Register:
- Click on “Accounting” in the left-hand navigation menu.
- Select “Chart of Accounts.”
- Find the bank account you want to unreconcile.
- Click “View register” next to that account.
Locate Cleared Transactions:
- In the register, look for transactions that have a checkmark in the reconciliation column (usually on the left side of the transaction). This indicates they were reconciled.
Change the Transaction Status:
- Click on the checkmark next to a transaction you want to unreconcile.
- Cycle through the options:
- “C” = Cleared and Reconciled (Click once to change to “R”)
- “R” = Cleared but NOT Reconciled (Click once to change to blank)
- Blank = Not Cleared or Reconciled
- Change the transaction status to Blank (not cleared or reconciled) for all transactions within the reconciliation you want to undo. This is the critical step, and you must be meticulous. Accidentally changing the status of other transactions can cause errors.
Repeat for All Transactions in the Reconciliation:
- Carefully repeat step 3 for every transaction that was part of the reconciliation you want to undo.
Important Considerations and Best Practices
- Back Up Your Data: Before undoing any reconciliation, consider backing up your QuickBooks Online data. This allows you to restore your data to its previous state if something goes wrong.
- Document the Reason: Document the reason for undoing the reconciliation. This helps you and others understand why the change was made and ensures transparency.
- Reconcile Promptly: Once you’ve made the necessary corrections, re-reconcile the account as soon as possible to maintain accurate financial records.
- Start with the Most Recent Reconciliation: If you need to undo multiple reconciliations, start with the most recent one and work backward.
- Avoid This Method if Possible: As mentioned, the “Register” method is prone to errors. Only use it if the “Reconciliation History” method isn’t available or feasible.
- Consult a Professional: If you’re unsure about undoing a reconciliation or have complex financial transactions, consult with an accountant or QuickBooks ProAdvisor. They can provide expert guidance and help you avoid potential errors.
In Conclusion
Undoing reconciliation in QuickBooks Online is possible, but it should be approached with caution. By understanding the implications, following the steps carefully, and keeping these best practices in mind, you can correct errors and maintain accurate financial records for your business. Remember to always prioritize data integrity and seek professional assistance when needed.