Your invoice is more than just a request for payment; it’s a direct reflection of your brand, professionalism, and attention to detail. A well-designed, clear, and branded invoice can enhance your business’s image, improve client communication, and even accelerate payment.
QuickBooks, in its various versions, offers robust tools to customize your invoice format, allowing you to tailor it to your specific business needs and aesthetic. This guide will walk you through the process for both QuickBooks Online (QBO) and QuickBooks Desktop (QBD).
Why Customize Your Invoices?
Before diving into the “how,” let’s quickly cover the “why”:
1. Professionalism: A polished invoice demonstrates credibility and attention to detail.
2. Brand Consistency: Integrate your logo, brand colors, and fonts to reinforce your identity across all client touchpoints.
3. Clarity & Efficiency: Organize information logically, making it easier for clients to understand what they’re paying for and when.
4. Legal & Compliance: Include specific disclaimers, terms, or payment instructions required by your industry or local regulations.
5. Marketing Opportunity: Add a personalized message, promotion, or link to your social media or website.
6. Improved Cash Flow: Clear payment terms and instructions can reduce delays and follow-ups.
What Can You Customize?
QuickBooks allows you to modify various elements of your invoice, including:
- Logo: Add your company logo for instant brand recognition.
- Colors & Fonts: Match your brand’s color palette and select legible fonts.
- Layout: Adjust the placement of fields, headers, and footers.
- Content: Choose which fields to display (e.g., Service Date, Ship To, P.O. Number).
- Custom Fields: Add unique fields relevant to your business (e.g., Project ID, Sales Rep).
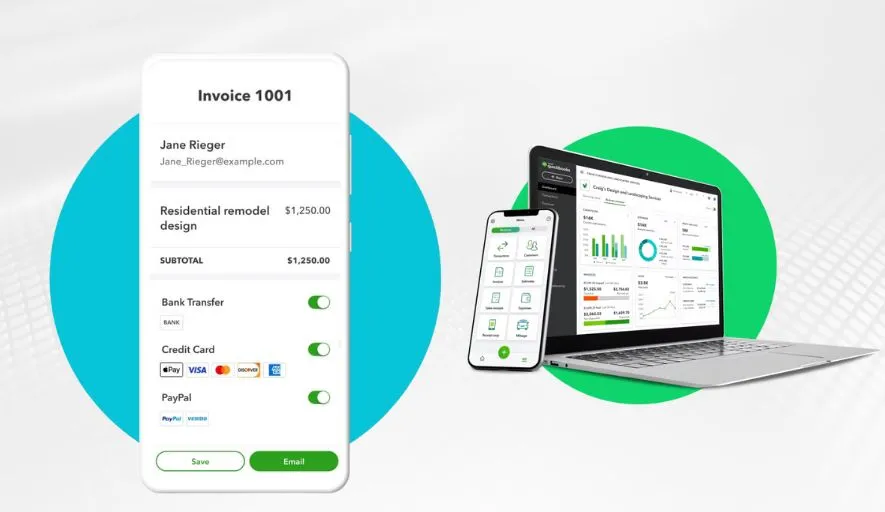
- Payment Instructions & Messages: Include clear payment details, due dates, thank you notes, or terms and conditions.
- Columns: Select which columns appear (e.g., Quantity, Rate, Amount).
- Terms & Conditions: Add standard legal or service terms.
How to Change Invoice Format in QuickBooks Online (QBO)
QuickBooks Online offers a user-friendly interface for customizing your sales forms.
1. Navigate to Custom Form Styles:
- Click the Gear icon (⚙️) in the top-right corner.
- Under “Your Company,” select Custom Form Styles.
2. Create a New Style or Edit Existing:
- To start fresh, click New style and choose Invoice.
- To modify an existing style, find it in the list and click Edit under the “Action” column.
3. Customize Your Invoice:
Design Tab:
- Change Template: Choose from several pre-designed templates (Airy, Modern, Classic, etc.).
- Add Your Logo: Upload your company logo.
- Colors & Fonts: Select your brand colors and preferred fonts for titles and body text.
- Margins: Adjust the page margins.
Content Tab: This is where you control what information appears and where.
- Header (Area 1): Click the pencil icon next to the header section.
- Choose what contact info to display (phone, email, website).
- Select which custom fields appear at the top.
- Add a company name or business number.
- Middle (Area 2 – Activity Table): Click the pencil icon for the main table.
- Columns: Pick which columns to show (Product/Service, Quantity, Rate, Amount, etc.). You can rename them and reorder their display.
- Show more activity options: Add a default message on invoices, display discounts, or deposit lines.
- Footer (Area 3): Click the pencil icon for the footer.
- Add a custom message to your customers (e.g., “Thank you for your business!”).
- Display payment details or other important information.
- Select if you want to show a Payment Stub.
Emails Tab:
- Customize the subject line and body message of the email that sends the invoice to your client.
4. Preview and Save:
- As you make changes, the preview on the right will update.
- Once satisfied, click Done in the bottom-right corner.
- Give your new style a distinctive Name (e.g., “My Company Branded Invoice,” “Standard Invoice with Legal Terms”).
5. Set as Default (Optional) or Apply to Individual Invoices:
- To set as default: From the “Custom Form Styles” list, find your new style, click the drop-down arrow under “Action,” and select Make default.
- To apply to a specific invoice: When creating or editing an invoice, look for the “Customize” or “Design” option (depending on your QBO interface version) and select your preferred style from the dropdown.
How to Change Invoice Format in QuickBooks Desktop (QBD)
QuickBooks Desktop offers powerful and detailed customization, though the interface can be a bit more involved.
1. Access Templates List:
- Go to Lists menu.
- Select Templates.
2. Create a New Template or Edit Existing:
- To start fresh: Click the Templates dropdown menu at the bottom of the window and select New. Choose Invoice as the template type.
- To edit an existing template: Select the template from the list and click the Templates dropdown, then select Edit Template.
3. Basic Customization:
- In the “Basic Customization” window, you’ll see several options:
- Logo: Click Use Logo to upload your company logo.
- Company Information: Review and edit your company details as they appear on the invoice.
- Font & Color: Choose the overall font and color scheme for the invoice.
- Field Selection:
- Header: Select which header fields to display (Invoice No., Date, Bill To, Ship To, PO No., Terms, Due Date, Rep, Ship Via, F.O.B., Project/Job).
- Columns: Select which columns to show (Item, Description, Quantity, Rate, Amount, Tax). You can also rename column titles here.
- Footer: Choose to show Total, Payments, Balance Due, and a Custom Message.
- Print: Configure print settings, such as printing company name, address, and legal lines.
4. Advanced Customization with Layout Designer:
- From the “Basic Customization” window, click Layout Designer. This opens a graphical editor for precise placement of fields.
- Drag and Drop: Move fields, text boxes, and images around the invoice preview.
- Add/Remove Elements: Use the “Add” and “Remove” buttons to include additional text boxes, data fields, or images.
- Properties: Select any element and click “Properties” to adjust its size, font, color, alignment, and visibility.
- Grid: Use the grid for alignment assistance.
- Make sure to save your changes frequently in the Layout Designer. Click OK when done to return to Basic Customization.
5. Additional Customization (Beyond Basic/Layout Designer):
- Back in the “Basic Customization” window, click Additional Customization (usually on the right or bottom). This opens another detailed window with tabs:
- Header: Fine-tune header field labels and visibility.
- Columns: Beyond just selecting columns, you can define their width, alignment, and specify which columns appear on screen vs. print. You can also reorder them.
- Footer: Customize footer field labels and visibility.
- Print: Control various printing options like “Print page numbers,” “Print sales tax,” and “Print item codes.”
6. Preview and Save:
- Click the Print Preview button at any time to see how the invoice will look.
- Once satisfied with all changes, click OK on all open customization windows.
- Make sure to give your new template a clear Template Name.
7. Apply Your New Template:
- To set as default: Go back to Lists > Templates, select your new template, and click the Templates dropdown at the bottom, then choose Make Invoice Default.
- To apply to a specific invoice: When creating a new invoice, look for the “Template” or “Form Template” dropdown at the top of the invoice window and select your customized template.
Tips for an Effective Invoice Design
- Keep it Clean and Uncluttered: Avoid too much text or unnecessary graphics. Focus on readability.
- Prominent Payment Information: Clearly state the total amount due, due date, and accepted payment methods. Bold or highlight this information.
- Include All Necessary Details: Ensure the invoice includes your business name and contact information, the client’s name and contact information, invoice number, date, itemized list of services/products, quantities, rates, and any applicable taxes.
- Proofread Meticulously: A typo-ridden invoice reflects poorly on your professionalism.
- Test on Different Devices (QBO): If your clients view invoices on mobile devices, check how your custom design renders.
- Consider a Payment Link: For QBO users, enable online payments to make it even easier for clients to pay.
QuickBooks’ invoice customization features empower you to create professional, branded, and clear invoices that represent your business effectively. Take the time to design a format that not only looks great but also enhances your operational efficiency and helps you get paid faster.