Imagine Portia, a burgeoning entrepreneur with a thriving new service business. She’s just landed her biggest client yet, the project is complete, and she’s ready for the next exciting phase: getting paid! But for many small business owners like Portia, the thrill of a new sale quickly shifts to the practical reality of financial management. Now, Portia needs to create an invoice in QuickBooks – but how can she ensure it looks professional and helps her get paid accurately and on time?
The answer, for many, lies in the power of accounting software like QuickBooks. For Portia, diving into QuickBooks to create her first official invoice isn’t just about sending a bill; it’s about establishing professionalism, streamlining her finances, and solidifying her business’s future.
Why a Professional Invoice Is More Than Just a Bill
Before Portia clicks a single button, it’s crucial to understand why invoicing done right is a cornerstone of business success:
Professionalism: A well-structured invoice reflects positively on your business, showing clients you are organized and serious.
Legal Record: It serves as a binding document of the transaction, detailing services rendered, agreed-upon prices, and payment terms.
Cash Flow Management: Clear invoices with specified due dates are essential for predicting and managing your business’s incoming funds.
Tax Compliance: Detailed invoices simplify tax preparation by providing a clear record of sales and income.
Tracking & Analysis: QuickBooks uses invoice data to generate reports, helping Portia understand her sales trends, identify top clients, and manage outstanding payments.
Portia’s Step-by-Step Guide to Invoicing in QuickBooks
For Portia, creating an invoice in QuickBooks is a surprisingly straightforward process designed to be intuitive. Here’s how she’ll do it:
Step 1: Log In and Navigate
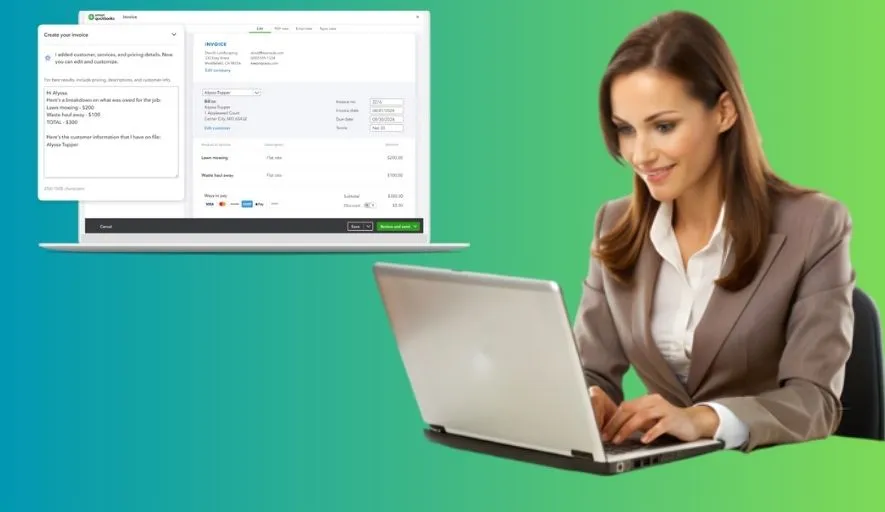
Portia logs into her QuickBooks Online account. From the dashboard, she’ll typically find a prominent “New” or “Plus (+)” button (often in the top left or right corner). Clicking this opens a menu of transaction types.
Step 2: Select “Invoice”
From the “New” menu, Portia selects “Invoice” under the “Customers” column. This opens a blank invoice form.
Step 3: Fill in Client Details
Customer: Portia starts by typing her new client’s name. If the client is already in QuickBooks, it will auto-populate. If not, she’ll add them on the fly, entering their essential contact information.
Invoice Date: This will usually default to today’s date, but Portia can adjust it if the service was completed on a different day.
Terms: This is crucial! Portia selects her payment terms (e.g., Net 15, Net 30, Due on receipt). This automatically calculates the “Due Date.” Clear terms set expectations for when payment is expected.
Invoice Number: QuickBooks usually auto-generates sequential invoice numbers, ensuring no duplicates and easy tracking.
Step 4: Add Service/Product Details
This is where Portia describes what she’s billing for:
Product/Service Column: Portia clicks here to select the specific service she provided (e.g., “Web Design,” “Consulting Hours,” “Graphic Design”). If it’s a new service, she can add it directly, defining its name, description, and default rate.
Description: She provides a clear, concise description of the work done. For example, “Phase 1: Website Wireframing and Content Strategy Meeting.”
Qty (Quantity) & Rate: Portia enters the quantity (e.g., hours worked, number of designs) and the agreed-upon rate per unit. QuickBooks automatically calculates the “Amount.”
Adding Multiple Lines: If Portia provided several distinct services, she simply adds more lines to the invoice.
Step 5: Incorporate Sales Tax (If Applicable)
If Portia’s services or products are subject to sales tax, she’ll ensure the correct tax rate is applied to each taxable item. QuickBooks can be set up to automatically calculate this based on her location and tax settings.
Step 6: Add Notes and Attachments
Message on Invoice: Portia can add a professional closing message like “Thank you for your business!” or specific project references.
Message on Statement: This message appears if she ever sends a client a statement showing their account history.
Attachments: If there are supporting documents (e.g., project mock-ups, signed agreements), Portia can attach them directly to the invoice, ensuring the client has all necessary information.
Step 7: Review, Save, and Send
Before sending, Portia takes a moment to review the entire invoice for accuracy – checking client details, service descriptions, quantities, rates, and total amount.
Preview: She can click “Print or Preview” to see exactly how the invoice will look to her client.
Save Options:
Save and Close: Saves the invoice and closes the form.
Save and Send: Saves the invoice and opens an email window, pre-populating with the client’s email and a customizable message. This is Portia’s preferred method for efficiency.
Save and New: Saves the current invoice and opens a blank new one, useful for batch invoicing.
Portia’s Pro-Tips for Better Invoicing
As Portia gains confidence, she discovers these valuable tips for optimizing her invoicing process:
Be Prompt: Send invoices as soon as work is completed. The sooner it’s sent, the sooner you get paid.
Be Detailed: Vague invoices lead to questions and delays. Provide clear, itemized descriptions of services.
Set Clear Payment Terms: Always specify due dates. Consider offering early payment discounts or outlining late payment fees (if part of your policy).
Follow Up: QuickBooks helps track outstanding invoices. If a payment is overdue, send a polite reminder.
Leverage Recurring Invoices: For repeat clients or subscription services, QuickBooks can automate recurring invoices, saving Portia valuable time each month.
Enable Online Payments: QuickBooks allows clients to pay directly via credit card or bank transfer through the invoice, significantly speeding up payment collection.
Beyond the First Invoice
For Portia, creating that first invoice in QuickBooks is just the beginning. The software then empowers her to:
Track Payments: Easily record payments received, automatically updating her accounts receivable.
Generate Reports: Access insightful reports like “Accounts Receivable Aging” (who owes her money and for how long) and “Sales by Customer.”
Reconcile Bank Accounts: Match invoice payments to bank deposits, ensuring her books are always accurate.
By mastering invoice creation in QuickBooks, Portia transforms a potentially tedious task into a seamless, professional, and powerful aspect of her financial management. It’s not just about sending a bill; it’s about building a robust financial foundation for her growing business.


